Roland Quad-Capture Bedienungshandbuch
Stöbern Sie online oder laden Sie Bedienungshandbuch nach Zusätzliche Musikausrüstung Roland Quad-Capture herunter. Roland Quad-Capture Owner`s manual Benutzerhandbuch
- Seite / 60
- Inhaltsverzeichnis
- FEHLERBEHEBUNG
- LESEZEICHEN
- Hi-SPEED USB 1
- Recording 2
- Windows/Mac OS X 2
- USING THE UNIT SAFELY 3
- IMPORTANT NOTES 5
- Additional Precautions 6
- Handling CDs 6
- Contents 7
- Contents of the Package 8
- License agreement 9
- Panel Descriptions 10
- Rear Panel 12
- Driver Installation 14
- Mac OS X 18
- Basic Use 23
- Output Device Settings 24
- Setup for Recording 25
- Input Device Settings 27
- Starting up the Control Panel 28
- Setting the Preamp 29
- Setting the Compressor 30
- Setting the Input Mixer 31
- Setting the Sampling Rate 31
- (3/4) Jack 32
- Initializing the Settings 33
- Checking the Signal Flow 33
- Equipment 34
- Checking the Driver Settings 35
- Troubleshooting 36
- Power Management Settings 45
- Setting the System Volume 47
- Reinstalling the Driver 49
- Advanced Driver Settings 51
- Main Specications 53
- Main Specications 54
- For EU Countries 56
- For China 56
- DECLARATION OF CONFORMITY 57
Inhaltsverzeichnis
+48VHi-SPEED USBIN 1/2MAINOUT 1/2IN 3/4 OUT 3/4IN OUTMIDIAUDIODIRECT MIXERD/AINPUTOUTPUTINPUT 1LINPUT 2RCOAXIAL IN(3/4)MIDI INMIDI OUTCOAXIAL OUT(3/4)
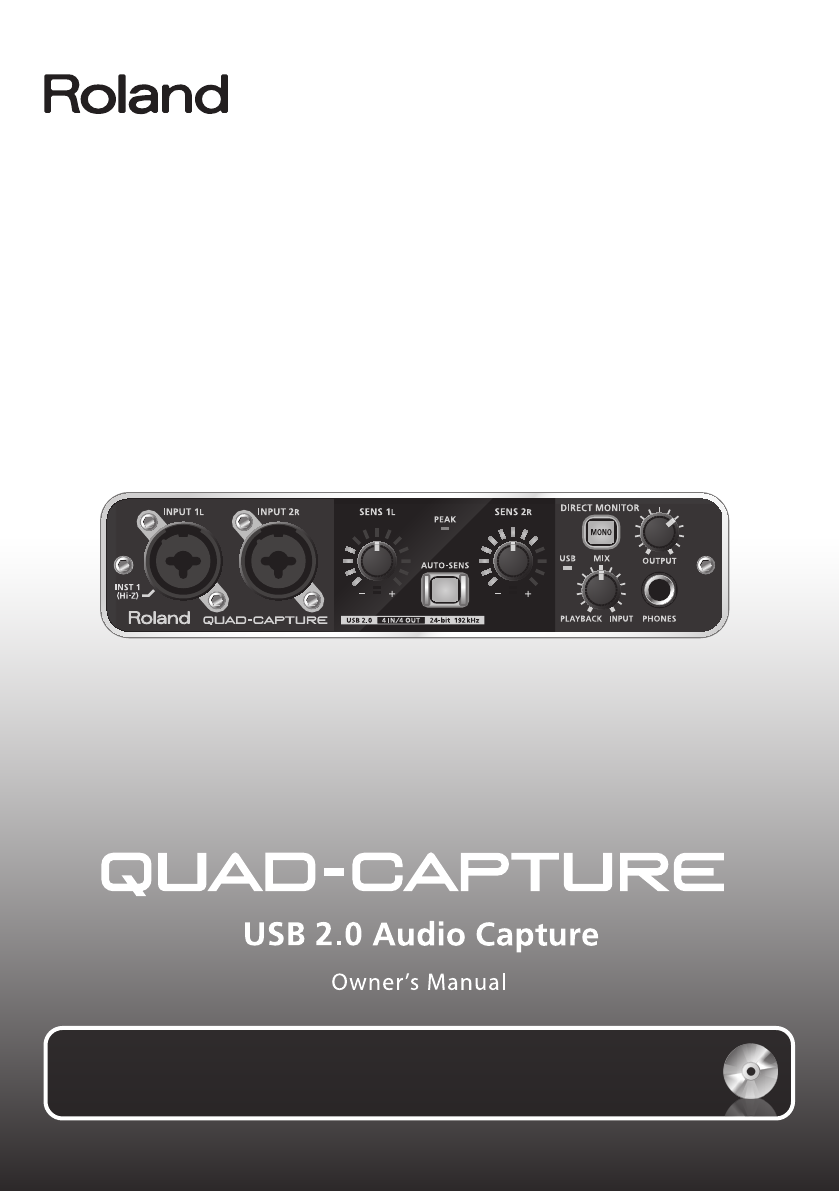
10Panel DescriptionsNoteDo not connect the QUAD-CAPTURE to the computer until the driver has been installed (p. 14).Front Panel12456 7891233101. INPU
11Panel Descriptions4. PEAK indicatorLights up when the input signal level is too high. Use the [SENS 1L] and [SENS 2R] knobs to adjust the input lev
12Panel DescriptionsRear Panel111214 15 16 1714121311. USB connectorConnects the QUAD-CAPTURE to a computer that is compatible with USB 2.0. Before c
13Panel Descriptions15. [GROUND LIFT] switchNormally, this switch should be set to “NOR” (NORMAL).If you experience noise due to a ground loop, etc.,
14NoteDo not connect the QUAD-CAPTURE to the computer until you are directed to do so.A “driver” is software that transfers data between the QUAD-CAPT
15Driver Installation5. When a conrmation screen regarding user account control appears, click [Yes] or [Continue].6. When “The QUAD-CAPTURE Driver
16Driver InstallationWindows 8.1/8/7/Windows Vista9. When “Installation has been completed.” appears, click [Close].If the “System Settings Change”
17Driver InstallationWindows XP9. If a dialog box that asks whether you want to connect to Windows Update appears, select [No, not this time] and cli
18Driver InstallationIf the “Authenticate” or “Installer requires that you type your password” dialog box appears during the installation, enter an ad
19Driver Installation14. Open the [Applications] folder and then the [Utilities] folder, and then double-click [Audio MIDI Setup].The “Audio MIDI Se
RecordingFlowchart: Using the QUAD-CAPTURE for RecordingDAW (Digital Audio Workstation) is the generic term used for music creation software.Install t
20Driver Installation20. Using your mouse, drag and connect ▲/▼ (which represent the input/output ports of each device) of the [QUAD-CAPTURE] and add
21Driver Installation1. Connect the headphones or amplied speakers as shown in the gure.Front panel Rear panelAmplied speakersHeadphones* To prev
22Driver Installation4. Adjust the volume.Use the QUAD-CAPTURE’s [OUTPUT] knob to adjust the volume.If the sample le can be heard, the computer and
23Basic UseThis section explains the basic connections and data ow of the QUAD-CAPTURE.Refer also to the block diagram on the back cover.Precautions
24Basic UseOutput Device SettingsTo play audio and MIDI data on your DAW software, select the QUAD-CAPTURE as the audio and MIDI output device. For de
25Basic UseSetup for RecordingAudio signals from the INPUT 1L jack, INPUT 2R jack, and COAXIAL IN (3/4) jack can be sent to your DAW software and reco
26Basic UseAdjusting the Input Level AutomaticallyThe AUTO-SENS setting allows you to have the optimum input level be set automatically, based on an a
27Basic UseInput Device SettingsTo record audio and MIDI data on your DAW software, select the QUAD-CAPTURE as the audio and MIDI input device. For de
28Setting from the Control PanelYou can control the AUTO-SENS setting via the QUAD-CAPTURE’s control panel, which is installed on the computer. The QU
29Setting from the Control PanelSetting the PreampScreen Indication Setting DescriptionLow cutEnables the low-cut lter for the input. The cuto frequ
3USING THE UNIT SAFELY• Do not open or perform any internal modications to the unit.• Do not attempt to repair the unit, or replace parts within it
30Setting from the Control PanelSetting the CompressorScreen Indication Setting DescriptionGate Mutes signals below a specied level (in dB).BypassWhe
31Setting from the Control PanelSetting the Input MixerYou can control the monitor level of the audio data being input via the INPUT 1L jack, INPUT 2R
32Setting from the Control PanelSelecting the Sound Output from the COAXIAL OUT (3/4) JackYou can select the sound (from either the computer (WAVE OUT
33Setting from the Control PanelInitializing the SettingsThe QUAD-CAPTURE allows you to initialize each setting.1. From the “Device” menu, select [In
34Setting from the Control PanelChanging the AUTO-SENS Setting MethodYou can choose whether to have the AUTO-SENS setting (p. 26) nish automatically
35Setting from the Control PanelChecking the Driver SettingsYou can check or modify the driver settings. For details, refer to “Advanced Driver Settin
36TroubleshootingIf you experience problems, read this chapter rst. It contains tips for solving most problems. If this chapter cannot help you solve
37TroubleshootingProblems When Using the QUAD-CAPTUREProblem Conrmation ResolutionCannot select or use QUAD-CAPTURE deviceIs the driver installed? In
38TroubleshootingProblem Conrmation ResolutionSound played by your computer is inaudible or too softCan you hear sound by connecting headphones?If yo
39TroubleshootingProblem Conrmation ResolutionThe volume level of the instrument connected to input connector is too lowIs the [MIX] knob turned to t
4USING THE UNIT SAFELY• Immediately disconnect the USB cable, and request servicing by your retailer, the nearest Roland Service Center, or an author
40TroubleshootingProblem Conrmation ResolutionSound is interrupted during playback or recording, sound drops outAre you using the included USB cable
41TroubleshootingProblem Conrmation ResolutionCannot play back or recordIs the driver installed? Install the driver (p. 14).Is the QUAD-CAPTURE’s sam
42TroubleshootingProblem Conrmation ResolutionCannot play back or recordIs it possible that the digital signal arriving as input has a dierent sampl
43TroubleshootingLimitations When Using the 192 kHz SettingIf the QUAD-CAPTURE’s sampling rate is set to 192 kHz, its operation will be limited as fol
44TroubleshootingChanging Computer Settings to Avoid ProblemsChanging these computer settings can help you avoid the problems described in “Problems W
45TroubleshootingPower Management SettingsIf the sound is interrupted during a performance or if sounds are missing, you may be able to resolve the pr
46TroubleshootingSystem “Performance” Settings (Windows)If the sound is interrupted during a performance or if sounds are missing, you may be able to
47TroubleshootingSetting the System VolumeIf the playback volume is too loud or too quiet, try adjusting the system volume.Windows 8.1/8/71. Open the
48TroubleshootingVoice Communication Software Settings (Windows 8.1/8/7)If you are using voice communication software, the volume of the audio device
49TroubleshootingReinstalling the DriverIf you experience problems installing the driver, use the following procedure and reinstall the driver.1. Del
5IMPORTANT NOTESPower Supply• Before connecting this unit to other devices, turn o the power to all units. This will help prevent malfunctions and/o
50Troubleshooting Mac OS X1. Start up the computer without the QUAD-CAPTURE connected.Disconnect all USB cables other than those for a USB keyboard a
51TroubleshootingAdvanced Driver SettingsYou can set the input and output audio buer size and ASIO-related settings.WindowsWhen using Windows 8.1/8/7
52TroubleshootingSetting Description[Match with the ASIO sample rate] (Windows 8.1/8/7/Windows Vista)You can match the Windows sound sampling rate (e.
53USB Audio Interface: Roland QUAD-CAPTURE UA-55Number of Audio Record/Playback ChannelsSampling Rate: 96 kHz, 48 kHz, 44.1 kHz Record: 4 channels Pla
54Main SpecicationsConnectorsInput jacks 1–2 XLR type (balanced, phantom power: +48 V, 6mA Max) * Current value per channel.1/4-inch TRS phone type
55IndexAAudio MIDI Setup . . . . . . . . . . . . . . . . . . . . . . . . . . . . . . . . . . 19AUTO-SENS . . . . . . . . . . . . . . . . . . . . . .
56For EU CountriesFor China
57This product complies with the requirements of EMC Directive 2004/108/EC.For EU CountriesFor CanadaThis Class B digital apparatus meets all requirem
59MEMO
6IMPORTANT NOTESAdditional Precautions• Please be aware that contents in memory can be irretrievably lost as a result of a malfunction, or improper o
+48VHi-SPEED USBIN 1/2MAINOUT 1/2IN 3/4 OUT 3/4IN OUTMIDIAUDIODIRECT MIXERD/AINPUTOUTPUTINPUT 1LINPUT 2RCOAXIAL IN(3/4)MIDI INMIDI OUTCOAXIAL OUT(3/4)
7ContentsUSING THE UNIT SAFELY ...3IMPORTANT NOTES ...5Contents of the Package ...8Pane
8Contents of the PackageAfter you open the package, please check that all items are present. (If any accessories are missing, please contact the place
9Contents of the Package License agreementThis agreement allows you to use certain software whose copyright is the property of Roland Corporation. You
Verwandte Produkte und Handbücher für Zusätzliche Musikausrüstung Roland Quad-Capture
 (28 Seiten)

 (20 Seiten)
© 2020, manymanuals.de. Alle Rechte vorbehalten. | 0.813 s |
 Manymanuals.com
 Manymanuals.de
 Manymanuals.fr
 Manymanuals.it
 Manymanuals.pl
 Manymanuals.cz
 Manymanuals.es
 Manymanuals-pt.com
Kommentare zu diesen Handbüchern